Saturday, January 28, 2012

Mini Skillet Cookies

For the holidays I received a gift card to Williams Sonoma.  It was the PERFECT gift since I just love that store and every time I am in it I want to buy everything.  However, seeing as how I am a poor college student/future teacher, buying the entire store is not practical nor possible.  This gift was great and I had so much fun shopping.

One of my purchases (so far) was a set of two mini cast iron skillets.  Cast iron skillets are AMAZING.  You can literally make any type of meal in them and what's better? They are MINI.  I just love cute, miniature things.  I have been wanting to try them out for some time now and the perfect occasion arose.  

Tonight I am going over to a friends to make dinner and to celebrate surviving our first week of the spring semester.  It was difficult, and on Thursday, I wasn't sure if I was going to make it.  Thursdays class was a THREE HOUR discussion.  That's right, a discussion.  Three hours of CHATTING with fifteen other people.  How am I supposed to get through that?  There's only 15 of us and we have to meet 3 hours a week.  We are going to get so sick of each other and there's no way were are going to have that much to say.  The discussion is the 15 future math teachers in my cohort and we are supposed to talk about "how to teach math" and our experiences in schools.  I suppose we are going to have plenty of stories from school, but school has not even started yet and so Thursday was brutal.  By the end of the three hours, I felt exhausted and drained.  I returned home, turned on the tv, and pondered over how I was going to survive those Thursdays.  

Not sure how I did it, but I woke up Friday totally refreshed and crazy exited about kicking of the weekend with dinner, dessert, and of course, friends! I figured mini cookie skillets would be the perfect dessert to make for this momentous occasion.  This recipe was inspired by Sophistimom and then I decided to use my "Famous" Chocolate Chip Cookie recipe and adapt it as needed for the mini skillets. The best part of this whole experience: you do everything IN THE SKILLET and so you only dirty one (or two in this case) pans.  Seriously! Skillets are great, go run out and get one.

Mini Cookie Skillets (adapted from Sophistimom)

Ingredients:
3 cups flour
3/4 tsp baking soda
3/4 tsp salt
1/2 tsp cinnamon
2 sticks (1 cup) butter, softened
3/4 cup sugar
1 cup brown sugar
1 tbsp vanilla
1 egg
1 egg white
12 oz milk chocolate chips

Directions:
Since we have two pans, you have to divide each of the ingredients in half.
1. Preheat oven to 375 degrees.
2. Melt 1/2 cup of butter in each pan over medium heat and then let cool for about 5 minutes.  Then, stir in the sugars to the butter.  This will be about 3/8 sugar and 1/2 cup brown sugar in each skillet. Finally, stir in 1/2 tbsp vanilla into each skillet.
3. Whisk the egg and egg white together and measure out about half into each skillet.  Stir to combine.
4.  In a medium bowl, or right into the skillet, mix the flour, baking soda, salt, and cinnamon.  This is about 1 1/2 cups of flour, 3/8 tsp baking soda, 3/8 tsp salt, and 1/4 tsp cinnamon each.  I combined these ingredients before I started, then poured about half of the dry ingredients into each skillet. Note: this got a little messy and I ended up pouring everything into a bowl to mix and then putting half of the batter back into each skillet.
5. Finally, stir in 6 oz of chocolate chips into each skillet and then bake for about 18 minutes (this will vary greatly based on the size of your skillet).


Note: My skillets probably had too much dough because they were done on the outside, but pretty mushy on the inside...I loved it, but next time I might only use half the batter divided into each skillet and then make some cookies with the rest.

Enjoy :)
Serving Options: Dump some ice cream, chocolate sauce, caramel, whipped cream or whatever over that skillet.  I ate mine plane because I'm a minimalist like that.

Wednesday, January 25, 2012

Red Velvet Cupcakes

Valentine's day is coming up.  When it comes to valentine's day, I'm not a huge fan...and I'm in a relationship.  Typically people who don't like valentine's day are just sad that they don't have a valentine.  Not me.  I just think it's a really dumb holiday because it isn't actually special.  Birthdays, anniversaries, and so forth are special because they are "your day." Valentine's day is a day where everyone has to get  PERFECT gift or plan the perfect date and make it super special for your valentine.  I think it's just silly.  I'm much more into random "Valentine's day moments" where you and your sweetheart just decide to do something special because you love each other.  That's special.  

However, Valentine's day does mean really pretty desserts and lots of chocolate...

So I guess I'm not completely turned off from Valentine's day.  I do love making cute desserts.  And so here we go: Red Velvet Cupcakes...the perfect dessert for Valentine's day :)

If you put "red velvet" anything in a title...I will try it.  Red velvet is easily my favorite thing ever when it comes to desserts.  Peanut butter and chocolate are a close second, but red velvet takes the cake (pun intended). I found this recipe on my latest obsession: Joy of Baking and then I simply changed it up a little based on what ingredients I had and the fact that I wanted to double the recipe and make 24 cupcakes instead of 12.  Also, I used a different Cream Cheese Frosting recipe from Skinny Taste.  When it comes to frosting I like it better when it is light and fluffy.  Plus, this called for less ingredients.  Now, check out my amazing Red Velvet Cupcakes!

Red Velvet Cupcakes with Cream Cheese Frosting

Ingredients:
Cupcakes:
2 1/2 cups all-purpose flour
1/2 tsp baking powder
1/2 tsp salt
2 tbsp cocoa powder
1/2 cup unsalted butter, room temperature
1 1/2 cups sugar
2 large eggs
1 tsp vanilla
1 cup light buttermilk
2 tbsp red food coloring
1 tsp white distilled vinegar
1 tsp baking soda
Frosting:
8 oz light cream cheese
1 cup powdered sugar
1 tsp vanilla

Directions:
For the cupcakes:
1. Preheat oven to 350 degrees and line cupcake pans with 24 cups.
2. In a medium bowl, sift flour, baking powder, salt, and cocoa powder together.
3. In a large bowl, beat the butter until light and fluffy.  Beat in the sugar until light and fluffy.  Then, add in the eggs and beat until well combined.  Finally, beat in the vanilla until well combined.
4. In a small bowl, whisk the buttermilk with the food coloring.  Then, alternate adding the dry ingredients and the buttermilk into the wet ingredients in three additions, starting and ending with the flour.  Mix until just combined.
5.  In a small cup, mix the vinegar and the baking soda and quickly fold into the batter.  
6.  Fill the cupcake cups about 2/3 full and then bake for about 20 minutes or until a toothpick comes out clean.
For the frosting:
1. Using an electric mixer, beat the cream cheese until light and fluffy.  Slowly add in the powdered sugar.  Finally, mix in the vanilla.
Enjoy :)


Sunday, January 22, 2012

No-Bake Cheesecake

School starts tomorrow and I have been having trouble accepting that fact.  True, I only have three classes this week.  Also true, I don't start going into the middle school for my practicum for another week.  So basically, school is only sort of starting.  However, I already have homework!

I spent my day making a cheesecake to kick-off the first DTS meeting of the semester.  This epic cake has to bake for 60-90 minutes.  So, that means I can get some work done while I'm waiting...right?  WRONG! I got my books out...and then decided to make a no-bake cheesecake recipe that I found while browsing my cheesecake options.  I think I may have a problem. I think I'm a baking addict...

The recipe looked really simple and really delicious and, in my defense, I did need to make a friend a cake as a present.  So really, I wasn't procrastinating.  I was being productive.  Yep, I'm going to go with that.

The original recipe, found at Joy of Baking, called for a 9-inch tart pan or springform pan.  Unfortunately, I left my new tart pan at home and my springform pan was already occupied with my first cheesecake.  So, I used a square 8 by 8 inch pan.  What was really good about this, was that this pan was disposable and came with a cute lid.  It's perfect for giving away!  Plus, a 9-inch tart pan and an 8 by 8 square pan are totally compatible and hold almost exactly the same amount.

No-Bake Cheesecake (adapted from Joy of Baking)


Square Cheesecake To-Go...weird right?

Ingredients:
Crust:
1 1/2 cups graham cracker crumbs
2 tbsp sugar
6 tbsp unsalted butter, melted
Filling:
8 oz cream cheese (I used regular)
1/4 cup sugar
1 tsp vanilla
1 cup heavy whipping cream

Directions:
1. Grease an 8 by 8 inch pan.
2. In a medium bowl, combine the graham cracker crumbs, sugar, and butter.  Press the crust mixture into the bottom the pan and up the sides, about 1 inch. Cover and place in the refrigerator while you make filling.
3.  In a large bowl, beat the cream cheese until smooth.  Add the sugar and beat until well combined and smooth.  Then, add the vanilla and beat to combine.  In a separate bowl, beat the cream until a soft peak forms and the cream starts to thicken.  Gradually, fold the cream into the cream cheese mixture.  Pour filling into the crust.  Spread the filling out so that it is even and refrigerate for several hours or overnight.
4. To serve: serve with fresh fruit or fruit topping.  Yum!
Enjoy :)

New York Cheesecake

I want to start my semester off as President of the DTS Little Sisters right.  I also want to make cheesecake.  I figured that combining these two things couldn't be a bad idea!  So, as tomorrow is our first meeting I decided that a "sweet" way to welcome the sisters back for a new semester would be to bring a cheesecake to the meeting.

I have always wondered what made New York style cheesecake different from other cheesecakes.  After searching for a good recipe...I am still baffled.  What makes it New York?  If anyone has any idea please clue me in because according to the plethora of recipes I found, there really is no one component that makes it "New York Style."

Sorry for the ranting, this has been on my mind for a while now...

And now, the recipe! I have recently fallen in love with Joy of Baking.  It's a great site where the recipes come with videos, photos, and explanations.  Plus, you can download an application on your phone that will allow you to see recipes and save ingredients to a grocery list.  How cool is that? Technology is really blowing my mind these days.  

Please check out the site for the New York Cheesecake recipe and to get a great video of how to make it! The original recipe calls for a 9-inch springform pan.  I only have a 10-inch, but the volume is still about the same and so it is okay to use either.  You might just need to shorten the baking time a little.  This cheesecake looks absolutely amazing and ridiculously rich.  I can't wait to try it tomorrow night! 

New York Cheesecake (adapted from Joy of Baking)


Ingredients:
Crust:
2 cups Graham Cracker Crumbs
1/4 cup sugar
1/2 cup unsalted butter, melted
So much cream cheese!
Filling:
32 oz Regular Cream Cheese 
1 cup sugar
3 tbsp all-purpose flour
5 eggs
1/3 cup heavy whipping cream
1 tbsp lemon zest
1 tsp vanilla


Topping:
1 cup regular sour cream
2 tbsp sugar
1/2 tsp vanilla
Directions:
1. Grease a 10-inch springform pan.  Place plan on a baking sheet.  Preheat oven to 350 degrees and make sure the rack is in the center of the oven.
2. Make the crust: In a medium bowl, combine the graham cracker crumbs, sugar, and butter.  Pour crust into your springform pan and press evenly over the bottom and about 1 inch up the sides.  Cover and refrigerate while making the filling.

3. Make the filling: Place the cream cheese, sugar, and flour in a large bowl.  Beat on medium speed with an electric mixer until smooth, about 2 minutes.  Scrape down the sides.  Add the eggs, one at a time, and beat well after each addition.  Scrape down the sides.  Add the whipping cream, lemon zest, vanilla, and beat until combined. Remove the crust from the fridge and pour the filling in.  Place the cheesecake on a baking plan and place in the oven.


4. Bake for 15 minutes.  Then, lower the oven temperature to 250 degrees and continue to bake for another 60-90 minutes.  The cheesecake is done with it looks firm, but the center looks a little wet and wobbly. When done, remove from the oven to cool.


5. While baking, make the topping: place the sour cream, sugar, and vanilla in a small bowl and whisk to combine.  Spread the topping over the warm cheesecake and then return the cake to the oven to bake for another 15 minutes.  Remove from the oven and run a knife around the sides of the cheesecake to loosen it from the pan.  Let the cake cool completely.  Then, cover with plastic wrap and refrigerate for several hours or overnight.  
Enjoy :)

mmmm...


Thursday, January 19, 2012

Double Chocolate Peanut Butter Muffins

Tonight my good friend Kimmy is coming back to school and we planned on a movie/baking night.  These are my two favorite activities most days and so I am extremely excited.  Kimmy suggested muffins and so I have been looking for a good recipe.

Another member of Optima Dance, Megan, has this great food blog.  Recently she posted about a great muffin recipe that she found.  They sound and look delicious and so I think I'm going to have to give them a try with Kimmy for our movie/baking night!  Now, we just need to decide on a a movie...any suggestions?

But first! I had a great dinner with my friends Caryn, Lauren, and Max.  I wanted to bring something, but didn't have that much time to actually make something.  So, I picked up some strawberries and chocolate and we made some amazing chocolate covered strawberries! Great last minute dessert!


Double Chocolate Peanut Butter Muffins (slightly adapted from A Dash of Megnut)

From: A Dash of Megnut

Don't hers look amazing??
Ingredients:
3/4 cup sugar
3 tbsp creamy natural peanut butter
1/4 cup non-fat sour cream
1 egg
1 egg white
1 cup whole wheat flour
1/4 cup cocoa powder
1/2 cup hot water
1/2 tsp baking soda
1/4 cup semi-sweet chocolate chips
powder sugar for topping (optional)


Directions:
1 Preheat oven to 350 degrees. Line muffin tin with baking cups or cooking spray.
2. In a large bowl, beat together sugar, peanut butter, sour cream, egg, and egg white.
3. In a medium bowl, mix flour, cocoa powder, and baking soda together. On a low speed, alternate mixing in the dry ingredients with the hot water into the wet ingredients until just combined.  Using a spoon, stir in the chocolate chips.
4. Spoon the batter into the muffin pan and bake for 15-20 minutes.  For mini muffins it should take around 12-15 minutes.  Muffins are done with an inserted toothpick comes out clean.  Remove the muffins from the oven to cool and sprinkle with powder sugar if you want.
Enjoy :)

Note: we made ours mini muffins and they took 15 minutes.  Also, we ended up watching Crazy Stupid Love and it was fantastic!

Sunday, January 15, 2012

French Apple Tart

Tonight is my last night at home with my family.  My parents are taking me out for a nice dinner at Francescas and then I decided to make one last great dessert for us to share together.  My cousin, Chris, gave me a tart pan for the holidays and with the pan she gave me a recipe for a French Apple Tart.  This was a great gift to give me (if anyone is looking for gift ideas/inspiration) and I was so excited to try out the new recipe.  Along with this gift, she gave me a rolling pin cover and pastry cloth.  Supposedly this is the way to go when dealing with any kind of dough.  She knows me so well!

French Apple Tart

Ingredients:
Pastry Dough:
1 11/4 cups all-purpose flour (I used white whole wheat and it turned out great!)
1/4 tsp salt
2 tsp sugar
8 tbsp unsalted butter (very cold, you can freeze it even), diced
5 tbsp ice water


Apples:
4 large Granny Smith apples
1/2 cup sugar
4 tbsp cold (you can freeze it) unsalted butter, diced
1/3 cup apricot jelly or jam
2 tbsp Calvados, rum, or water (I used 1 tbsp water and 1 tbsp rum)

Directions:
For the pastry:
1. Place flour, salt, and sugar in a food processor fitted with a steel blade and pulse a few times to combine.  Add the butter and pulse 10 to 12 times, until the butter is in small bits the size of peas.  With the motor running, slowly add the ice water just until the dough starts to come together.  Dump the dough onto a lightly floured surface and knead it into a ball.  Wrap it in plastic wrap and refrigerate for at least 1 hour.  I let it chill overnight.

For the tart:
1. Preheat the oven to 400 degrees.
2. Roll the dough on a slightly floured pastry cloth until it is slightly larger than the tart pan.  Place the dough on the tart pan and press to fit the pan.  Using the rolling pin, roll over the top edge of the tart pan to cut and remove the overhanging dough.  Place the tart pan in the refrigerator.
2. To prepare the apples, keep the skins on and core the apples.  Then, slice into moderately thin slices. Take the tart out of the refrigerator and arrange the apples in the pan.  Use all the apples, it is okay if it is overfilled as the apples will shrink while baking.  Sprinkle with the 1/2 cup of sugar and dot with the butter.
3. Bake for 45 minutes to 1 hour, until the pastry is browned and the edges of the apples start to brown. Mine took exactly 45 minutes.  When the tart's done, heat the apricot jam with the Calvados, rum, or water, and brush over the tart.  Allow to cool completely and serve heated up or at room temperature.
Enjoy :)


Friday, January 13, 2012

Healthy Brownies

From Delicious Wordflux
Some days you just crave something delicious and comforting.  Whether it is sadness or stress, everyone experiences problems and everyone deals with them differently.  I am experiencing both of these right now and I started craving some comfort.  Typically, a good quart of Ben and Jerry's Phish Food ice cream does the trick, but I also have decided to work on being healthier and exercising more.  So, I recalled a recipe for Olive Oil Brownies that I found on Delicious Wordflux.  They looked amazing and they were whole wheat and used olive oil instead of butter.  I found this really interesting and so I saved the recipe.  Today I turned to that recipe to bring some comfort into my life without forgetting my health.  I also decided to make a few changes to encompass my personal comfort favorites.

While in Door County this winter break, my family found a bag of dark chocolate/mint chips in the grocery store.  We had never seen these before and it was very exciting.  We bought them and brought them back home.  We figured that they would be great in basically any of our favorite recipes.  Today seemed like a great day to use them! I substituted half the chocolate chips in the original recipe for these dark and minty ones.  For the other half, I decided on Hershey's Special Dark Chocolate Chips.  I just know that these healthy brownies will turn out amazing.  How can they not? They have the best chips in them!

I hope that this recipe is as enjoyable for others and that it brings comfort to anyone who needs a little at this time :)

Dark and Minty Olive Oil Brownies

Ingredients:
3/4 cup sugar
2 large eggs
1/2 cup extra light virgin olive oil
1/3 cup milk (I used skim)
1 tsp vanilla extract
1 cup white whole wheat flour
1/4 cup unsweetened cocoa powder
1/4 tsp baking powder
pinch of salt
2 cups dark chocolate chips
1 cup dark/mint chocolate chips


Directions:
1. Preheat the oven to 350 degrees and grease a square 8x8 inch baking dish.
2. In a medium bowl, sift flour, cocoa powder, baking powder, and salt.
3. In a mixer, beat eggs with sugar until well mixed.  Then, add in olive oil, milk, and vanilla.  Slowly add in the dry ingredients and beat until just combined.
4. Melt the 2 cups of dark chocolate chips in the microwave.  I did one cup at a time and microwaved for 30 second increments until melted.  Pour melted chocolate into the brownie mixture and quickly whisk to combine.  Using a spoon, stir in the mint/dark chocolate chips.  Pour into prepared baking dish and bake for 30-35 minutes.
Enjoy :)


Thursday, January 12, 2012

Date Night-Vienna Style

Brian and I have been thinking of a good date night to have before we both go back to our schools.  We had such a wonderful time on our vacation in Austria that we decided to celebrate that wonderful week and make a dinner inspired by it.  The dinner has to be vegetarian and in terms of Viennese cooking, this seriously limits our options.  However, Vienna is famous for it's noodles: spaetzle.  We decided on a spaezle dish with grilled veggies and of course for dessert: sachertorte.  This cake is easily one of the best things I have ever had and so we were both very excited to see if we could do it justice.  Also, the spaetzle recipe does not seem too daunting and it will be my first try at making my own noodles.  Overall, this meal sounds amazing and is also fairly simple to make.  If you want a taste of Vienna, this is the meal for you!

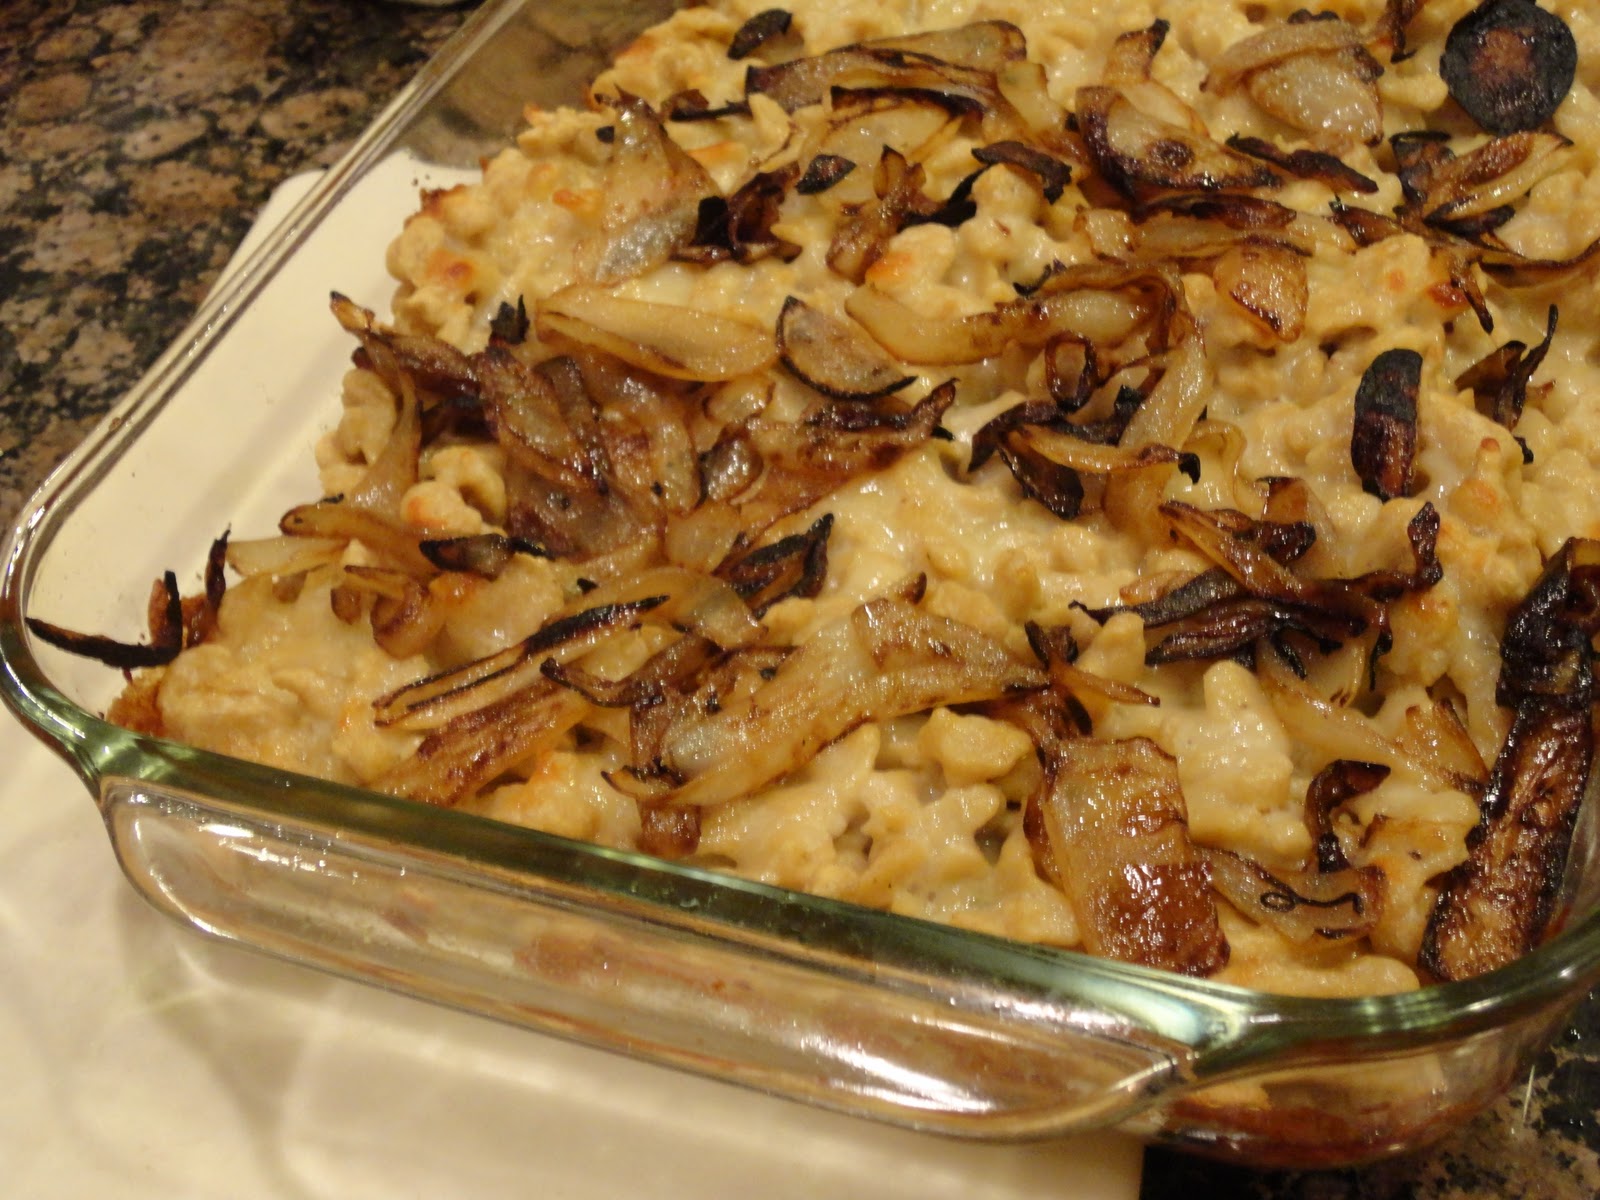
Spaetzle with Gruyere and Caramelized Onions (adapted from Food & Wine)

Ingredients:
1 3/4 cups skim milk
4 large egg yolks
1 large egg
3 cups white whole wheat flour (I used King Arthur)
1/4 tsp nutmeg
salt and pepper
2 tbsp olive oil
1 tbsp unsalted butter, cut into small pieces
1 1/2 cups shredded gruyere cheese
1 medium white onion, thinly sliced

Directions:
1. In a small bowl, whisk milk, egg yolks, and egg.  In a separate, large bowl, combine flour, nutmeg, salt and pepper.  Using a wooden spoon, stir egg/milk mixture into the flour mixture.  Dough will be a little lumpy.  Cover and refrigerate for at least 1 hour or overnight.
2. Bring a large pot of salted water to a boil.  Prepare another large bowl of ice water.  Hold a colander with large holes over the boiling water and carefully press about 1/2 cup of the spaetzle dough through the holes and into the pot.  Continue until all the dough is used up and cook for another 2 minutes.  Drain the spaetzle and immediately transfer it to the ice water.  Stir the dough until all the ice is melted and then drain.  Transfer to a large bowl and stir in 1 tbsp of the oil.  Season with salt and pepper and toss it all up until evenly coated.
3. Preheat oven to 400 degrees.  Oil a 9 x 13 inch baking dish.  Spread the spaetzle in the dish and dot with the pieces of butter.  Sprinkle the cheese over the spaetzle and bake for about 20 minutes. Spaetzle should be hot and cheese should be melted.
4. While spaetzle is in the oven, cook the onions in the remaining olive oil over high heat until they are softened, about 1 minutes.  Reduce heat to low and stir occasionally for about 15 minutes until the onions are nicely browned.  Serve over the baked spaetzle.
Enjoy :)


Sauteed Veggies


Ingredients:
2 red peppers, cut into thin slices
1 bunch of asparagus
3 large carrots, peeled and cut into rounds
Grapeseed oil

Directions:
1. In a saute pan, place peppers and asparagus and desired amount of oil.  Cook until veggies are softened.  In a medium pot, bring carrots and water to a boil.  Cook covered until carrots are softened. This makes a lot of veggies, but that's okay because they're good for you :)  Mix all veggies together and serve.


Sachertorte (adapted from epicurious)

Ingredients:
Torte:
  • 4 1/2 ounces high-quality bittersweet chocolate, finely chopped
  • 9 tablespoons (1 stick plus 1 tablespoon) unsalted butter, at cool room temperature
  • 1 cup confectioners' sugar
  • 6 large eggs, separated, at room temperature
  • 1 teaspoon vanilla extract
  • 1/2 cup granulated sugar
  • 1 cup all-purpose flour (spoon gently into cup and level top)

Assembly:
  • 1 cup Apricot Glaze (recipe below)
  • Small Batch Chocolate Glaze (recipe below)
  • Unsweetened Whipped Cream (for serving) (recipe below)

Directions: 
1. To make the torte: Position a rack in the center of the oven and heat to 400 degrees. Lightly grease a 9 inch springform pan and line the bottom with a round of parchment paper. Dust the sides of the pan with flour and tap out the excess.
2. Place chocolate in a microwavable safe bowl and microwave on half power until chocolate is melted,  stirring every 30 seconds or so.
3. Beat the butter in the bowl of a stand mixer fitted with the paddle blade on medium-high speed until smooth, about 1 minute. On low speed, beat in the confectioners' sugar. Return the speed to medium-high and beat until light in color and texture, about 2 minutes. Beat in the egg yolks, one at a time, scraping down the sides of the bowl. Beat in the chocolate and vanilla.
4. Beat the egg whites and granulated sugar in a large bowl with a handheld electric mixer on high speed just until they form soft, shiny peaks. Do not overbeat. Stir about one fourth of the beaten whites into the chocolate mixture to lighten it, then fold in the remaining whites, leaving a few visible wisps of whites. Sift half of the flour over the chocolate mixture, and fold in with a large balloon whisk or rubber spatula. Repeat with the remaining flour.
5. Spread evenly in the pan. Bake until a toothpick inserted in the center comes out clean, about 45 minutes. (The cake will dome in the center.) Cool on a wire rack for 10 minutes. Remove the sides of the pan, and invert the cake onto the rack. Remove the paper and reinvert on another rack to turn right side up. Cool completely.
6. To assemble: Using a long serrated knife, trim the top of the cake to make it level. Cut the cake horizontally into two equal layers. Place one cake layer on an 8-inch cardboard round. Brush the top of the cake layer with the apricot glaze. Place the second cake layer on top and brush again. Brush the top and sides of the cake with the remaining glaze. Transfer the cake to a wire rack placed over a jelly-roll pan lined with waxed paper. Let cool until the glaze is set.
7. Make the chocolate glaze (it must be freshly made and warm). Pour all of the warm chocolate glaze on top of the cake. Using a metal offset spatula, gently smooth the glaze over the cake, allowing it to run down the sides, being sure that the glaze completely coats the cake (patch any bare spots with the spatula and the icing that has dripped). Cool until the glaze is barely set, then transfer the cake to a serving plate. Refrigerate until the glaze is completely set, at least 1 hour. Remove the cake from the refrigerator about 1 hour before serving.
8. To serve, slice with a sharp knife dipped into hot water. Serve with a large dollop of whipped cream on the side.


Apricot Glaze:
Ingredients:
1 1/4 cup apricot preserves
2 tbsp golden rum

Directions:
1. In a medium saucepan, heat preserves and rum over medium heat, stirring often for about 2-3 minutes or until mixture is very sticky.  Pour over a colander with small holes into a bowl pressing mixture into the colander.  Use warm.
Apricot Glaze

Chocolate Glaze:
Ingredients:
4 oz bittersweet chocolate
1/2 cup water
1 cup sugar

Directions:
1. In a small sauce pan over high heat bring all ingredients to a boil, stirring occasionally.  Reduce heat to medium and cook, stirring occasionally for about 5 minutes.  Remove saucepan from heat and stir to thicken for about a minute.  Use immediately for cake assembly.


Unsweetened Whipped Cream
Ingredients:
1 cup heavy whipping cream
1/2 tsp vanilla

Directions:
1. Beat ingredients in a chilled bowl until it reaches the desired consistency.  

Enjoy :)


A couple notes: We didn't bother with the whipped cream because we are not huge fans, but unsweetened is definately the way to go.  Plus, it is how it is served in Austria.  Also, this was the ugliest cake I have ever made seeing as how when I went to cut it, it fell apart.  Next time, if there is a next time, I'll probably chill the cake before slicing it so that it is more firm.  Overall though, the cake tasted great and the spaetzle dish was absolutely fantastic :)


Supposed to look like:

Source: Original Sachertorte